YouCanMakeThis.com - Instant Download! Free Shipping Wildly Wonderful Wearables

Finally, A Show About Garment Sewing! Sandra Betzina is the Best!

Wednesday, September 27, 2006

Easy Halloween Face Painting Designs

Hi Sewing Friends:

I'm visiting my 12 year old grandson this week-end and guess what we will be doing? You are right! We are going to be sewing his Halloween costume. He loves to help me sew.

He hasn't decided exactly what he wants yet, but I'm sure he will come up with an idea or two.

I can't believe that Halloween is nearly upon us. Are you busy sewing costumes? This is really fun sewing. It doesn't have to be perfect. There are so many costume ideas out there. It is sometimes difficult to choose what to sew.

Kids as well as adults might want to have their face painted to add to the fun. Face painting is a lot safer than wearing a mask. A mask often hinders eyesight and accidents happen. Kids usually love to have their faces painted.

Here are some quick tips for face painting as well as a link to a fantastic ebook called, Easy Face Painting: How You Can Get Professional-Looking Results ... Even If You've Never Picked Up A Paintbrush that will make your face painting so easy. Anyone can do it.

Grandparents, this is a great way to entertain your grandkids. This ebook will come in handy at kids parties, too.

Learn how to face paint. Click here.

Now, here are the tips I promised you.

Have fun,

Marian

=-=-=-=-=-=-=-=-=-=-=-=-=-=-=-=

Easy Halloween Face Painting Designs

By: Face Painting

With Halloween quickly approaching, face painting season is kicking into high gear. Try these easy, but immensely child-pleasing Halloween "cheek art" designs at class parties, fall festivals and homecoming carnivals.

TOOLS

Begin with good quality, water-based face paints. You can find them online or in some theatrical stores. A palette of six, good-quality face paints is priced around $12.00 and includes enough paint for 70 or more cheek art designs. Water-based face paints apply as easily as watercolors and remove cleanly with a paper towel and water. For a small gathering of children, two or three small to medium sized paint brushes will be sufficient. A bowl of water to rinse the brushes and a roll of paper towels conclude the list of basic supplies.

GHOST

In my opinion, the simplest design to paint is that of a ghost. The basic shape of the ghost is that of a triangle. With a brush loaded with white paint, paint a loose triangle by creating a wavy line to outline the ghost. Fill in with more white paint, dot on black eyes and a smile and the ghost is complete.

CANDY CORN

Nothing is "sweeter" than a face dotted with painted candy corn. The basic shape is a pyramid, with yellow on the bottom third, orange on the middle third and white at the peak. You can create a candy corn crown by painting the candies in succession along the forehead.

JACK-O-LANTERN

To paint a jack-o-lantern, begin with a circle or oval of orange paint. When the orange paint dries, add small triangles in black paint for the eyes and nose and paint a toothy smile in black as well. Add a green stem and your jack-o-lantern is complete.

IN SUMMARY

The most important thing to remember when face painting is to have fun and keep it simple! Children aren't expecting a Picasso to be painted on their face. They simply love to celebrate the occasion and face painting is the perfect way to light up the face of any child.

Article by:

JoAnne Westcott is the author of Easy Face Painting: How You Can Get Professional Results Even If You've Never Picked Up A Paintbrush. You can learn more about face painting and how to acquire the simple skills to get started by visiting Easy Face Painting

Be the hit of the party! Learn how to Face Paint - Click here!


Feed Shark

Link
Finally, A Show About Garment Sewing! Sandra Betzina is the Best!

Monday, September 25, 2006

Sewing Tips - Can You Mix And Match Sewing Pattern Pieces

Sewing Tips

Sewing Friends:

Many of you ask this question: "Can I mix and match sewing pattern pieces like collars and sleeves?"

I hope this gives you the info you need to design your own tops with confidence.

It just makes sense!

To Your Sewing Success,

Marian

=-=-=-=-=-=-=-=-=-=-=-=-=-=-=

Sewing Tips - Can You Mix And Match Sewing Pattern Pieces

- by Marian Lewis

©2006 Marian Lewis - All Rights Reserved

1st Step To Sewing Success

=-=-=-=-=-=-=-=-=-=-=-=-=-=-=

When you sew, many times you want to change the design and have a different collar or sleeve on your garment. Most often, you will look for another sewing pattern that has all the features you are looking for and start the fitting, trial and error process all over again.

When you know how to sew, you can have whatever you want on any garment. You are the designer. You can create "original designs" just like other designer does.

You just have to know a few rules and use a little common sense with your sewing projects. For instance, you can't use a set-in sleeve in a dropped shoulder design.

Fit the bodice once!

Fit your bodice or blouse once and use it over and over again. After you have your basic bodice or blouse fit your figure the way you want it, try changing the styles of the sleeves, collars, etc. to give you more variety instead of getting another pattern and altering it to fit you again. This will save you a lot of time and frustration.

Make several copies of this "master" fitted bodice and change the design features on each one to have a whole wardrobe of tops that fit you perfectly. Make sure you label them so you know what each one is when you go to use it.

There are only so many collar and sleeve designs. You can interchange them on your garment sewing pattern. Go through your sewing pattern box and select the ones you like that are most flattering for your figure.

The rule is that if you choose a sleeve or a collar from another pattern, you should also copy the armhole or the neckline curves from the bodice of that pattern onto your personal basic bodice master pattern that already fits you. Then, you can sew the new collar or sleeve onto your personal basic bodice/blouse without any problems because they are going into the same curves as they were originally intended.

You have changed the design, but not affected the fit because you used the body of the master sewing pattern that you know already fits you.

Remember to copy the facing that matches the collar you use so that it fits the garment also.

Place the new sleeve or collar with one of your "master" bodices with the appropriate matching armhole or neckline curves. Mark it so you know what it is and you are all set to sew it anytime you want.

Change necklines and other details from another sewing pattern

To change to a totally different neckline like changing a jewel neckline to a V-neckline, lay the pattern with the desired detail or neckline on the top of the pattern that you know fits you.

Match up the shoulder lines , center front and center back. Now draw your new neckline. The collar and facings of the new neckline with fit because it is the same neckline they were originally designed for.

Handle sleeve changes similarly.

Add a seam anywhere

You can add a seam anywhere you like on a pattern. For instance, if you want a yoke, draw a line on one of your "master" bodices where you would like the yoke to be. Cut the pattern apart on that line. Add a 5/8" seam allowance to both cut edges. When you sew this back together, you have a yoke and you haven't changed the fit of the garment.

Create your own original designs. Have fun being a designer.

It just makes sense!

=-=-=-=-=-=-=-=-=-=-=-=-=-=-=-=-=-=-=-=-=-=-=

End Of Article

=-=-=-=-=-=-=-=-=-=-=-=-=-=-=-=-=-=-=-=-=-=-=

PS: If you enjoyed this article or have a comment, please do so here on my Sewing Success Blog.

Actually, you can check out most of my articles here. You might find something that interests you in the archives. Check it out. I welcome your feedback :-)

Save time and get good sewing info. Just sign up for my Free "Sewing Success Newsletter" to be delivered to your email inbox on a regular basis.

=-=-=-=-=-=-=-=-=-=-=-=-=-=-=-=-=-=-=-=-=-=-=

If you have sewing related questions that you would like to have answered, ask them here or at Burning Question.

I'll do my best to answer them for you.

=-=-=-=-=-=-=-=-=-=-=-=-=-=-=-=-=-=-=-=-=-=-=

Marian Lewis is a sewing instructor, author and creator of an amazing new fitting method for hard-to-fit sewing folks who want great fitting skirts and pants. In her mini-course ebook, she teaches step-by-step common sense techniques how to find out WHAT you really need, WHERE you really need it and HOW to apply that to a commercial sewing pattern.

Marian is also the author of many articles and other mini-course ebooks related to sewing highlighting, "It Doesn't LOOK Homemade"Sewing Techniques.

Check out her website at 1st Step To Sewing Success.

Discover Fitting And Sewing Secrets To Achieve Sewing Success

Check out the mini-course ebooks:

"Common Sense Fitting Method For Hard-To-Fit Sewing Folks Who Want Great Fitting Skirts And Pants"

"Sew A Tee Pee And Accessories For Your Tribe Of Kids"

"Classy Designer Straight Skirt"

=-=-=-=-=-=-=-=-=-=-=-=-=-=-=-=-=-=-=-=-=-=-=

**Attn: Ezine editors / Site owners **

Feel free to reprint this article in its entirety in your ezine, blog, autoresponder, or on your site so long as you leave all links in place, do not modify the content and include our resource box as listed above.

Please let us know if you use the article and where you put it so we can take a look. Thanks!

Feel free to substitute your affiliate link in place of our link in the resource box.

Affiliate details are available here:

"1st Step To Sewing Success" Affiliate Program

See more about sewing

Keywords: , , , , ,

Feed Shark

Sewing Tips
Link
Finally, A Show About Garment Sewing! Sandra Betzina is the Best!

Thursday, September 21, 2006

The Perfect Princess Tea Party

Friends:

Annette Yen has written an ebook on, "I Love Princess Parties". You should really check this out. It is a delightful way to entertain the little girls in your life.

Jody Roberts, from Florida said:

"This book takes the brainwork out of the planning for your Princess party. It's Organized & Outlined with Step-by-Step information. It's like a birthday party manual for busy moms of girls!"

Personally, I can't think of a more fun party for a little girl than this. What a treasured memory for all.

These are the things that your little girl will remember, not what you bought her, but what you did for her like these special events that make her feel so very special. Isn't this better than going to a fast-food place for a party?

Here is an article Annette wrote giving you 7 simple steps for a Perfect Princess Tea Party as a sample.

To Your Success,
Marian

=-=-=-=-=-=-=-=-=-=-=-=-=-=-=-=-=-=-=-=-=
The Perfect Princess Tea Party - 7 simple steps

By: Annette Yen
=-=-=-=-=-=-=-=-=-=-=-=-=-=-=-=-=-=-=-=-=

Can you think of anything more feminine, more lovely, more "girly" than a group of young girls... all dressed in their princess finery sitting down to a decked out tea table with royal dainties?

Girls across the globe love dress up and love tea...so why not combine the two and make the perfect event for your girls!

Here are 7 easy steps toward making the perfect memory for your little princess:

1. Set a date: Keep in mind the ages of your little ones and set the time when they won't be too tired, too hungry or too cranky! The "official" teatime is late afternoon, but that doesn't mean you can't have a wonderful teatime in the morning as well.

2. Invite: The fun begins. Being a princess requires invitations of the most royal kind. Lovely linen paper is easy to find at your local craft or office supply store. Run it through your home printer with a fancy font and you're done. Send the invitations out about 2-3 weeks before your tea so your guests can plan accordingly.

3. Decorate: Let your princess help with this part...after all, it is HER event. Royal colors include purple, gold, pink and silver and aren't those the favorites of girls anyway? Balloons, streamers and more balloons! We'll talk about the tea table in a minute.

4. Make the food: Traditional tea fare includes scones and clotted cream. Other royal tea treats are chocolate covered strawberries, thumbprint cookies, cucumber sandwiches (or substitute the ever popular PB&J sandwich for younger ones) and miniature teacakes.

5. Set the table: Go all out here. Use a lovely tablecloth, cloth napkins and real teacups not plastic. Not only will this be fun for your little ones, but it'll be a great lesson in etiquette as well as they learn to put on their finest manners for your tea.

6. Plan some games: Great princess games abound but keep it simple. Hide some gold-foiled covered coins around the house and have a hunt to return the royal treasure. Use a lovely glass bowl as the treasure chest. Spread your gold and silver balloons all over the "ballroom" floor and play classical music for a royal ball with much dancing.

7. Enjoy the day: Most of all make it fun. Take many pictures and record the memories. Your little princess will go to bed that night smiling from ear to ear with the joy of the day!

=-=-=-=-=-=-=-=-=-=-=
Article by: Annette Yen

Do you want to throw an affordable princess party that the neighbors will talk about for years to come? Click here to find out how.

=-=-=-=-=-=-=-=-=-=-=
Feed Shark
Link
Finally, A Show About Garment Sewing! Sandra Betzina is the Best!

Tuesday, September 19, 2006

Maternity Clothes Do Not Need To Make You Look Like A Tent On Legs

Sewing Friends:

Keep some of these thoughts and suggestions in mind when making maternity clothes for yourself or your family. Everyone always wants to look their best. Look around at ready-to-wear for ideas. Invest your sewing time in some classic mix and match basics and buy the rest.

To Your Sewing Success,
Marian

=-=-=-=-=-=-=-=-=-=-=-=-=

Maternity Clothes Do Not Need To Make You Look Like A Tent On Legs

by: K Snow

=-=-=-=-=-=-=-=-=-=-=-=-=

The most inconvenient thing during pregnancy is the process of modifying your dresses to your ever increasing stomach and or choosing what to wear that will not make you look like a tent.

Today you don’t need to wear your husband's clothes to hide your belly. The only thing that it will do is make you look dowdy and uncouth.

Neither do you have to wear dresses made as if there was only one standard model called pregnant and nothing else.

Today the options for pregnant women to choose from are humungous.

The clothing takes into consideration that there are some women who like to show off their bump and then there are some modest conservative ones who would rather hide it than flaunt it.

Companies that have launched maternity ranges have conducted research prior to developing the entire range to ensure that it includes options for those who carry their weight high or low.

Specially designed clothes enable you to emphasize the more flattering parts of our body while reducing the focus on the belly. Care is also taken to provide support to the increasing weight of the breasts.

These aspects can only be kept in mind by trained designers and so do not resort to wearing overalls with no cut which have been recommended to you by your grandmother. Rather, be the modern mom of today and dress nattily even when you are supporting a huge stomach.

We can today bid a permanent goodbye to boring white, black and beige tent houses and skirts that fall sloppily and look at the bright colored options that these companies provide. Colors which match the mood of the expecting mother like orange, red, turquoise are definitely more apt and suitable.

Other than alternatives in color you can also take your pick from among skirts, tops, trousers, track pants and long flowing gowns which will mesmerize you at first site.

Never has shopping for clothes during pregnancy been more interesting and amusing. These days the tables have turned a complete 180 degrees, wherein the choice is so much that it gets confusing.

This at times even gets annoying because though you would like to pick up the swankiest of options available, you are aware that they can last you only for a very short period of time. Even if you do not lose enough weight to get back to your original size, you are definitely not going to have that huge belly forever.

Discover more articles and resources discussing fashion and clothing by visiting http://www.discover-fashion.com/
Link
Finally, A Show About Garment Sewing! Sandra Betzina is the Best!

Monday, September 18, 2006

Sew A Pillow Sham From Vintage Hankies And Other Old Linens

Sewing Friends:

This holidays will soon be upon us and we will be racking our brains for sewing gift ideas.

How many of you have some old vintage hankies or dresser scarves or old embroidered pillow cases or crocheted doilies laying in your drawers or cedar chest in the attic somewhere? Think about what you can do to give them new life.

Make a collage and frame them; sew pillows; make a bedroom cornice, sew an apron (they are back in style), a table runner, placemats, etc. Sewing little girls dresses out of old vintage pillow cases is real trendy right now. Include them in some of your garments as well as part of a yoke or a pocket. Of course, you can also sew them into a gorgeous quilt, too. Use your imagination.

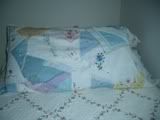
Why not put them on display by sewing a pillow sham for your bed or give it as a gift to someone you love? That's what I did for both my daughter and son when they married. And, there wasn't a whole lot of sewing to it. So, even if you don't know much about how to sew, you can do this.

I made this pillow sham for my daughter about 24 years ago. It has special meaning for her. The hankies were mine, her grandmother's and her great-grandmother's. In fact, one of the hankies was a high school graduation gift to me 50 years ago. Imagine giving a hankie as a gift to a graduate today! My daughter says this sham, which still sits on her bed, is one of her most treasured gifts. She loaned it to me to show you.

I'm not a good photographer, but you will get the idea, I hope. It really is very pretty.

Image hosted by Photobucket.com

The lace I used around the edges of the pillow sham were pieces left over from her wedding gown. So, it is a 4 generation remembrance for her.

To make this sham, I simply used a purchased king size white pillow case as the base. Then, I cut and arranged the hankies where I wanted them using pieces of lace to cover any raw edges that were exposed. Pin or fuse edges to hold in place. Then sew using either a small zigzag or blindhem stitch to hold permanently. You might also try sewing some lace around the outside edges of the pillow sham to finish it off or add a ruffle made from more hankies, or some of your crocheted edges, etc.

The pillow sham that I made for my son was a collage of old embroidered dresser scarves and pillow cases with crocheted edges that his grandmother made many years ago. It was very special to him as well, as he remembers her sewing with her embroidery hoop stitching those colorful flowers and figures.

It just makes sense to use these old treasures and not hide them in the drawer. Enjoy them every day. Sew them into something useful and beautiful.

Always remember that YOU are the designer. There are no rules, just do it and have fun with it.

To Your Sewing Success,

Marian

PS: Let me know how you used your old vintage linens in your sewing projects. I would love to hear from you.


See more about sewing

Keywords: , , , , ,

Feed Shark
Link
Finally, A Show About Garment Sewing! Sandra Betzina is the Best!

Saturday, September 16, 2006

Easy Kids Crafts For Halloween

Sewing Friends:

Here are some easy kids crafts for Halloween. Join in the fun of Halloween.

You will find many more ideas in the I Love Halloween ebook. They have just reduced the price, so you will want to take advantage of this right now. Go to the "I Love Halloween" site.

Marian

=-=-=-=-=-=-=-=-=-=-=-=
Easy Kids Crafts For Halloween

By: Halloween Costumes

Are your kids excited about Halloween yet?

We don’t have a day go by where my daughter doesn’t ask me if it’s time to go trick-or-treating yet.

Keep them busy while they wait with these easy kids craft ideas you can do together.

Ghost Hand Puppet

Kids love playing with puppets and there’s hardly an easier puppet to make than a ghost. All you need is a white paper towel, or a white handkerchief, a rubber band and a black marker.

Ask your child to spread out her thumb and pinky, but keep the 3 other fingers together. Drape the paper towel over her hand and secure the rubber band around the three fingers. This will be the ghost’s head; the thumb and pinkie form the arms.

Draw eyes and a mouth on the paper towel and the little ghost puppet is finished.

Ghost Lollipops

Dress up the lollipops you are giving away for Halloween by wrapping a white tissue or small piece of fabric over them. Secure it with a piece of string or a rubber band. Take a black marker and draw eyes and a round mouth on the ghost’s face.

Spider Webs

What would Halloween be without spiders and spider webs? Make these cute little spider webs with the kids and hang them in the window. All you need are 3 craft or clean popsicle sticks and some white or black yarn.

Take two of the craft sticks and glue them together to form a cross. Glue the 3rd one right in the middle, forming a star shape. Tie one end of the yarn around one of the craft sticks in the center.

Start weaving it over one craft stick and under the other. Keep going around, forming your spider web. Make sure you leave at least 1/4th inch of the craft sticks sticking out and secure the loose end by tying it to one of the craft sticks.

Glue a small plastic spider in the center and hang your spider web up.

Witch Broom Pencil

Witch broom pencils make a cute Halloween gift that doesn’t involve candy. You can turn any pencil into a witch’s broom with a handful of household items. All you need is a regular pencil, some small twigs out of the yard, some string and a little glue.

Break the twigs into equal lengths pieces and line them up around the unsharpened end of a pencil. Make it look like an old fashioned broom. Secure the wigs with string, and then apply a thick layer of glue to keep it all in place.

Cauldron Candy Dish

To make this cute cauldron candy dish, start with an empty round plastic container (like a cool-whip container). Clean it, dry it, and then paint it black.

Paint three small wooden balls black as well. After the paint is dry, glue them to the bottom of your plastic container. Add a handle made out of wire if you’d like and your candy dish cauldron is done. Just add some of your favorite Halloween candy.

Pumpkin Painting

Carving funny or scary faces into a pumpkin is a lot of fun, but it also gets quite messy and small kids can’t really do much since there’s a knife involved. Buy a few small pumpkins instead, or in addition to the big carving pumpkin. Use permanent pens or acrylic paint to draw funny faces on your mini-pumpkins.

=-=-=-=-=-=-=-=-=-=-=-=-=-=-=

Article by: Susanne Myers & Nicole Dean

Make a Halloween Costume

Would you like to quickly make creative Kids Halloween Costumes that you and your children will be proud of -- for a fraction of the price of store-bought? Susanne Myers has co-authored a book to show you how -- no sewing involved.

Visit http://wahmcart.com/x.php?adminid=43&id=179&pid=98 to learn more.

=-=-=-=-=-=-=-=-=-=-=-=-=-=-=-=-=

Feed Shark
Link
Finally, A Show About Garment Sewing! Sandra Betzina is the Best!

Thursday, September 14, 2006

Sexy Jeans For Oversized Women

Hi Sewing Friends:

I think I get more questions about jeans than anything else.

Here is an article that I thought you might like.

However, I still believe there is nothing more flattering than a well fitted pair of pants no matter what your age or size. And, of course, the best are custom made by you or someone else, but just for your unique body. It is possible. You can do it! See my fitting method for pants at Common Sense Fitting.

To Your Sewing Success,
Marian

=-=-=-=-=-=-=-=-=-=-=

Sexy Jeans For Oversized Women

by- Gloria Diaz

=-=-=-=-=-=-=-=-=-=-=

More oversized women experience the difficulty of fitting their way into the glamorous world of fashion and beauty. The reason?

Most superficial societies highly favor slimmer figures and slender curves when it comes to details of a perfect female body.

Of course, one size doesn't fit all and although it is ideal, size zero is not synonymous to being sexy.

Yes, regular exercise and rigid diet help women to look thinner and sexier. Yet, while training and exercise can be conducive to good health, not everybody has the discipline it takes.

In that case, women can use proper clothing to conceal their bulges and other imperfections.

The latest trend is to wear sexy womens jeans.

The good news is, even oversized women can now have the confidence and comfort in jeans and apparels that complement and suit their form and shape.

Since there are many selections offered nowadays, the only concern is picking the right bottoms.
There are some womens jeans today that are too skimpy and further show the problem areas of oversized women.

If you are an avid fan of Oprah, you may have picked up already on the tips given by guests and clothing gurus, Trinny and Susannah: skimpy jeans don't look good on any woman.

Though magazine spreads, TV commercials, and billboards nowadays feature women in the latest slim jeans, the experts claim that no woman can carry those pants. However, loose-fitting, tapered, or so-called baggy pants won't do good to the figure of an oversized woman, either.

According to the duo, many American women make the mistake of being stuck in the 80s and wearing tapered pants.

But, more often than not, badly fit pants make you look bigger than you intend to be.

The safer way toward fashion glam is to look for comfort in the cut. A good cut of womens jeans highlights just the right shapes and brings out the assets in your body and personality.

Oversized women could choose flared or bootleg cuts so that their flabs, which are usually found in the mid-portion and thighs, could be balanced by the outward bottom part of the pants.

Aside from the cut, oversized women can also be sexy by choosing the right style, design, or color for their pants. For curvaceous or voluptuous women who also have large butts to flaunt, pants without or less flambuoyant pockets could be worn for balance.

As much as possible, light colors should also be avoided because these accentuate the heaviness of the oversized person.

By just considering all these elements, oversized women can definitely look gorgeous in the hippest pair of jeans.

If you need more information on jeans and womens jeans, you can check out www.sexy-jeans.net
Link
Finally, A Show About Garment Sewing! Sandra Betzina is the Best!

Wednesday, September 06, 2006

Homemade Halloween Costume Ideas For Children

Halloween Costumes For Kids


Halloween Costumes


Sewing Friends:

Here are some ideas for easy Halloween costumes for kids. Of course, the pattern companies have lots of sewing patterns, too. Halloween is the busiest sewing time of the year.

To quickly make creative Halloween costumes that you and your children will be proud of -- for a fraction of the price of store-bought-- no sewing involved, follow this link. You will find over 90 Halloween costume ideas and instructions.

Kids love to play "Dress Up". Don't forget to take advantage of the sales after Halloween to put together a "Dress Up Box" for your kids for a Christmas gift. See my article in the October 2005 archives here on my blog or go to my website at http://www.1ststeptosewingsuccess.com/article-archives.html


To Your Sewing Success,

Marian
=-=-=-=-=-=-=-=-=-=-=-=-=-=-=-=-=-=-=-

"Homemade Halloween Costume Ideas For Children"

By: Nicole Dean

=-=-=-=-=-=-=-=-=-=-=-=-=-=-=-=-=-=-=-

You can find a large variety of Halloween costumes available at stores in your neighborhood.

However, when you consider the cost and lack of originality, homemade costumes are a more fun and oftentimes more cost-effective option. Plus, if you involve your children in creating the homemade costumes, the results will be worth more than any store-bought costume in any store.

Here are some inexpensive, homemade Halloween costume ideas that will cost little money and show lots of imagination.

Scarecrow:

An over-sized flannel shirt, some straw, and faded jeans with patches will make a great scarecrow. Stuff the jeans and shirt with plastic grocery bags and leave a little straw hanging out of the shirt and jeans. A little makeup will complete your scarecrow costume.

Ghost:

Ghosts are an old stand-by that never goes out of style. Use an old white sheet with holes cut for the eyes and sew a simple treat bag out of a scrap of material or a worn out pillow case. You can dress your ghost up a bit by making lips out of red lipstick and a few false eyelashes. Or you could color a beard and moustache with markers. You may want to create a colorful ghost by using a sheet covered with polka dots or one that is brightly colored.

Clown:

You can create a great clown with sweat clothes that are a bit to large decorated with fabric paint or markers. Sew on some pom poms, use an inexpensive wig with a large, colorful hat, and you could even stuff the clothing with tissue (although the tissue will be a problem if the need for a restroom break arises).

Hippy:

You can become a hippy from the 1960s with a tie-dye shirt and faded jeans with holes in the knees. Combine this with a headband, a ponytail wig, and a jacket or vest covered in fringe and you will have the most authentic looking hippy costume of all time.

Nerd:

Halloween is the time to dress like something completely out of character. You can dress your child as a typical nerd, complete with white shirt, pocket protectors, pants that are too short, horn-rimmed glasses, while socks and black dress shoes. Don't forget to tape one corner of the glasses for a true nerd appearance. Make sure you use plenty of hair gel to slick back the hair and a few overly large fake teeth will be a great addition.

Soda Can:

Find an inexpensive plastic barrel and cut a hole in the bottom. Paint the entire barrel the colors and design of your favorite brand of soda in a can. With holes for arms and your head, a simple barrel can transform your child into a soda can.

Your child can be the hit of your block or at the neighborhood Halloween party if you use a little imagination and create special homemade costumes out of inexpensive, household items.

Like the commercials say "The memory of your child in a costume you made together"... priceless.

=-=-=-=-=-=-=-=-=-=-=-=-=-=-=

Would you like to quickly make creative Halloween costumes that you and your children will be proud of -- for a fraction of the price of store-bought? Nicole Dean has co-authored a book to show you how -- no sewing involved. Check it out here.

=-=-=-=-=-=-=-=-=-=-=-=-=-=-=

Halloween Costumes For Kids
Link
Finally, A Show About Garment Sewing! Sandra Betzina is the Best!

Saturday, September 02, 2006

Sewing Tips - How Much Bias Can You Cut From A Square Of Fabric?

Sewing Tips

Hi Sewing Friends:

This question is asked frequently.

"How much bias can you cut from a square of fabric?"

Print the following article and keep it in your sewing information notebook for future reference.

To Your Sewing Success,

Marian

=-=-=-=-=-=-=-=-=-=-=-=-=-=-=

Sewing Tips - How Much Bias Can You Cut From A Square Of Fabric

- by Marian Lewis

©2006 Marian Lewis - All Rights Reserved

1st Step To Sewing Success

=-=-=-=-=-=-=-=-=-=-=-=-=-=-=

If you have been frustrated in the past trying to figure out how much bias you need and how much fabric you need for it, here is a simple formula to help you determine just how much bias you can cut from a square of fabric no matter what width of bias you want.

Keep this handy in your sewing notebook for future reference.

Bias Formula To Determine How Much Bias You Can Cut From A Square Of Fabric

1. Multiply the length by the width of the fabric square.

2. Divide this number by the width of bias needed. This will tell you the number of inches of bias that you will get.

3. To find the number of yards, divide the number of inches by 36 (the number of inches in one yard).

Here is an example of how to do your calculations for a sewing project:

Determine how much bias you need for your project.

Let's assume that you are sewing a set of placemats and you want to sew a half inch binding around them.

This placemat measures 18 inches by 12 inches. (18 + 18 + 12 + 12) = 60 inches around one placement.

Eight placemats (8 x 60) = 480 inches plus a little extra to overlap the ends of the bias on each placemat.

For this example, we will add an extra 2 inches for each placemat or 16 inches. 480 + 16 = 496 inches is the total length of bias that you need for this project.

To get the number of yards of bias that you need, divide 496 by 36 (the number of inches in one yard).

That gives you 13.7 or about 14 yards that you need to bind all 8 placemats.

Determine the width of the binding that you will cut.

You must cut the binding 4 times the finished width.

So, for a one half inch finished binding, you must cut the binding 4 x 1/2 inch or 2 inches wide.

Now you know how many yards of binding you need and how wide you must cut it.

The next question is how many yards of 2 inch wide bias can you cut from a 36 inch square of fabric.

Use the above formula to determine the yardage in a 36 inch square:

Step 1. 36 inches x 36 inches = 1296 inches

Step 2. 1296 inches divided by 2 inches (the desired width of the bias) = 648 inches

Step 3. 648 inches divided by 36 inches = 18 yards

So, if a 36 inch square will give you 18 yards of 2 inch wide bias, you will need an extra yard of fabric to make the half inch bias binding for 8 placemats.

FYI:

A 45 inch square makes about 28 yards of 2 inch bias (for one half inch finished bias binding).

With this information, you can easily calculate all your bias requirements. No more guessing!

It just makes sense!

=-=-=-=-=-=-=-=-=-=-=-=-=-=-=-=

End of Article

=-=-=-=-=-=-=-=-=-=-=-=-=-=-=-=

PS: If you enjoyed this article or have a comment, please do so here on my Sewing Success Blog.

Actually, you can check out most of my articles here. You might find something that interests you in the archives. Check it out. I welcome your feedback :-)

Save time and get good sewing info. Just sign up for my Free "Sewing Success Newsletter" to be delivered to your email inbox on a regular basis.

=-=-=-=-=-=-=-=-=-=-=-=-=-=-=-=-=-=-=-=-=-=-=

If you have sewing related questions that you would like to have answered, ask them here or at Burning Question.

I'll do my best to answer them for you.

=-=-=-=-=-=-=-=-=-=-=-=-=-=-=-=-=-=-=-=-=-=-=

Marian Lewis is a sewing instructor, author and creator of an amazing new fitting method for hard-to-fit sewing folks who want great fitting skirts and pants. In her mini-course ebook, she teaches step-by-step common sense techniques how to find out WHAT you really need, WHERE you really need it and HOW to apply that to a commercial sewing pattern.

Marian is also the author of many articles and other mini-course ebooks related to sewing highlighting, "It Doesn't LOOK Homemade"Sewing Techniques.

Check out her website at 1st Step To Sewing Success.

Discover Fitting And Sewing SecretsTo Achieve Sewing Success

Check out the mini-course ebooks:

"Common Sense Fitting Method For Hard-To-Fit Sewing Folks Who Want Great Fitting Skirts And Pants"

"Sew A Tee Pee And Accessories For Your Tribe Of Kids"

"Classy Designer Straight Skirt"

=-=-=-=-=-=-=-=-=-=-=-=-=-=-=-=-=-=-=-=-=-=-=

**Attn: Ezine editors / Site owners **

Feel free to reprint this article in its entirety in your ezine, blog, autoresponder, or on your site so long as you leave all links in place, do not modify the content and include our resource box as listed above.

Please let us know if you use the article and where you put it so we can take a look. Thanks!

Feel free to substitute your affiliate link in place of our link in the resource box.

Affiliate details are available here:

"1st Step To Sewing Success" Affiliate Program

See more about sewing

Keywords: , , , , ,

Feed Shark

Sewing Tips
Link
Google
Web 1ststeptosewingsuccess.blogspot.com