


Sew Some Christmas Tree Napkins, Name Tags And Ornaments
- by Marian Lewis
©2005 Marian Lewis – All Rights Reserved
1st Step To Sewing Success
=-=-=-=-=-=-=-=-=-=-=-=-=-=
Sew Some Christmas Tree Napkins, Name Tags and Ornaments!
A Quick And Easy Gift Even If You Don't Sew!
Make Christmas tree napkins to give as gifts to family and friends at holiday time.
Stitch up a set for yourself, too! They are quick, easy and fun to make.
You only need a little fabric and time. The trick is in the folding and pressing to make the napkin look like a Christmas Tree.
Napkins can be either single or double layer of fabric. They can be any size you want them to be. The example I am using here is a 14-1/2"
Use some pretty Christmas prints or some unusual decorative fabrics.
One year, I used a lacey fabric and rolled the edges with a gold metallic thread. Then, I hung them on my tree. It really looked pretty.
You really don't have to sew these napkins if you don't want to. You can use decorative edge craft scissors to cut the fabric and not finish it with sewing at all.
You can even use paper napkins if you like. Have fun with this idea.
Less than a yard of 45" wide fabric makes 6 napkins single layer or 3 double layer.
1-5/8 yards makes a dozen single layer napkins.
Preshrink all fabrics.
I also like to spray starch my fabric before I cut and serge or satin stitch the edges of my napkins.
Cut Napkins into 14-1/2" circles.
To make a paper pattern, draw a circle 14-1/2" in diameter.
=-=-=-=-=-=-=-=-=-=-=-=-=-=-=-=-=-=-=-=-=-=
Here is how to make a compass to draw your pattern.
=-=-=-=-=-=-=-=-=-=-=-=-=-=-=-=-=-=-=-=-=-=
Tie a string or ribbon to a pencil.
Measure the string back from the pencil 7-1/4".
Put a pin in the string/ribbon at that point.
(7-1/4" is the radius or 1/2 of the diameter of the 14-1/2" circle.)
This is your compass to help you draw your circle.
=-=-=-=-=-=-=-=-=-=-=-=-=-=-=-=-=-=-=
Here is how to draw your pattern.
=-=-=-=-=-=-=-=-=-=-=-=-=-=-=-=-=-=-=
Place some tracing paper down and put the pin in the center.
Now, extending the string, and using the pencil, draw a circle out all around the pin 7-/4"away.
This creates a 14-1/2" circle for your napkin pattern.
Label it and keep it for future napkins.
=-=-=-=-=-=-=-=-=-=-=-=-=-=
Single Layer Napkins
=-=-=-=-=-=-=-=-=-=-=-=-=-=
Serge finish with the right side up on your serger.
I like to use the rolled edge finish on most of my napkins. It depends on the fabric.
Feed the circle of fabric to the knife slowly letting the knife shave off a little of the fabric.
Slightly overlap the beginning stitches about 2 inches.
Seal the end with "Fray Check". Let dry. Trim off the thread tails.
=-=-=-=-=-=-=-=-=-=-=-=-=-=
Double Layer Napkins
=-=-=-=-=-=-=-=-=-=-=-=-=-=
Place 2 circles wrong sides together.
Make sure one circle's straight grain matches the other circle's bias grain.
This will minimize flared edges.
You can also apply slight differential feed to eliminate flared edges.
Or you might want to baste the two layers together to help hold them while you finish the edges.
=-=-=-=-=-=-=-=-=-=-=-=-=-=
Serge Finish Edges With A Serger
=-=-=-=-=-=-=-=-=-=-=-=-=-=
A rolled edge works well on light to medium weight single layer napkins.
A rolled edge may not work on the double layer fabrics or heavier fabrics. Test it first.
Try using a narrow satin balanced stitch instead.
Note: If you get the "Pokies", try wrapping the napkin bias edges in Solvy (a water soluble stabilizer) and then serge. Wash the Solvy away when finished.
=-=-=-=-=-=-=-=-=-=-=-=-=-=-=-=-=-
Conventional Machine Satin Stitch Finish
=-=-=-=-=-=-=-=-=-=-=-=-=-=-=-=-=-
If you don't have a serger, you can use your conventional sewing machine.
Finish the edges with a satin stitch sewing in from the edge using a stabilizer such as water soluble Solvy.
You may want to spray starch the napkins again before stitching. It might help.
You can apply "Fray Check" to the outside of the stitching when you are finished to seal the edges.
Let it dry and then trim off any excess fabric.
=-=-=-=-=-=-=-=-=-=-=-=-=-=-=-=-=-=-=-=-=-=-=
Fold and press the napkin into a Christmas Tree Shape.
Here are the folding instructions.
=-=-=-=-=-=-=-=-=-=-=-=-=-=-=-=-=-=-=-=-=-=-=
1. Fold the napkin in half and press well. We will call this fold the center fold.
2. Fold again into quarters and press lightly. This is a temporary crease that we will use as a guide to establish the fold we actually want.
3. Open back up to the 1/2 fold again and measure 1-1/4" above the temporary quarter foldline.
4. Fold the napkin "back" along the 1-1/4" new line (the one above the quarter fold) and press well. We will call this fold, Fold A.
5. Now you have a fold at the top, (Fold A) and the lower part of the center fold to your right.
6. The upper part of the center fold that you just turned down, we will call Fold B.
7. Take the top Fold A and bring it over to meet the center fold edge to your right and press in place.
8. Now bring the upper portion of the original center fold (Fold B) over on top of Fold A and to the lower portion of the center fold edge and press again.
Maybe these drawings will help.
=-=-=-=-=-=-=-=-=-=-=-=-=-=-=-=-=-=-=
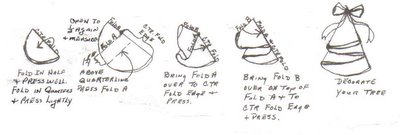 Voila! There you have a Christmas Tree.
=-=-=-=-=-=-=-=-=-=-=-=-=-=-=-=-=
Decorate your trees
=-=-=-=-=-=-=-=-=-=-=-=-=-=-=-=-=
Add a bow, jingle bell, decorative Christmas button or whatever at the top of the tree if desired.
Embroider each family member's name on his/her napkin.
Use decorative stitches, paint or decorate your tree napkins any way you like.
=-=-=-=-=-=-=-=-=-=-=-=-=
More Ideas For Smaller Trees
=-=-=-=-=-=-=-=-=-=-=-=-=
Consider making smaller circles into trees, add a ribbon loop at the top and use them to decorate packages or to hang on your Christmas Tree as ornaments.
Use up lots of that stash! It is easy!
Or, how about letting the kids cut some circles from paper napkins and have them decorate their trees with crayons, stickers like stars, glitter glue, etc.
They could give them to family members, classmates, teachers, etc., use them on packages, hang them on the big tree, or use them as place cards at the dining table.
Be creative. You are the designer. Have fun making your tree napkins!
It just makes sense!
Happy Holidays!
=-=-=-=-=-=-=-=-=-=-=-=-=-=-=-=-=-=-=
Marian Lewis is a sewing instructor, author and creator of an amazing new fitting method for hard-to-fit sewing folks who want great fitting skirts and pants. In her ebook, she teaches step-by-step common sense techniques how to find out WHAT you really need, WHERE you really need it and HOW to apply that to a commercial sewing pattern.
=-=-=-=-=-=-=-=-=-=-=-=-=-=-=-=-=-=-=
Discover Fitting Secrets To Achieve Sewing Success
Click Here =>
"Common Sense Fitting Method For Hard-To-Fit Sewing Folks Who Want Great Fitting Skirts And Pants"
=-=-=-=-=-=-=-=-=-=-=-=-=-=-=-=-=-=-=
**Attn: Ezine editors / Site owners **
Feel free to reprint this article in its entirety in your ezine, blog, autoresponder, or on your site so long as you leave all links in place, do not modify the content and include our resource box as listed above. Feel free to substitute your affiliate link in place of our link in the resource box.
Affiliate details are available here:
"1st Step To Sewing Success" Affiliate Program
See more about sewing
Keywords: sewing, sewing tips, sewing techniques, sewing projects, how to sew, sew
Feed Shark
=-=-=-=-=-=-=-=-=-=-=-=-=-=-=-=-=-=-=-=
posted by Marian at 10:50 AM
![]()
![]()


0 Comments:
Post a Comment
<< Home